Sunday 26 June 2016

YUGUE: the turtle of wisdom in the kitchen

Upon entering the Lady De Mohun entrance hall, a visitor to Hordle Castle must choose how to proceed with the tour from three doors - Venus (love), Juno (power), and Minerva (wisdom). This last door leads to another tiny vestibule I call 'Sophia' (Greek for wisdom). And from here you have three more options: you can either leave (not very adventurous of you), or go to 'Horace' (the wine cellar, hardly wise to dwell in those crampt Bacchic depths for too long), or continue on the path of wisdom to Yugue the kitchen.

Why Yugue? Well, in the 19th century, turtle soup was an expensive delicacy amongst the rich. Once the meat had been dissected and devoured, the remains of the turtle - the shell or the bones - were often kept in the kitchen as a token reminder that the prestigious dish had been cooked there (as at Burghley House).

The Chinese word for turtle is pronounced Yugue (like the Kung Fu Master in Kung Fu Panda), and turtles in Chinese culture represent wisdom, probably because they live so long. So if a Hordle visitor knows what's good for one, they must first choose the first door of wisdom, and then choose the wisdom of tasting delicacies fresh from the kitchen. For me, to focus attention on tasting is to practise Mindfulness from which I feel the best wisdom comes. 

I found a toy turtle and decided to dismember the head and legs just as the Victorian cooks would have done, and display the shell as a centrepiece for my castle kitchen.


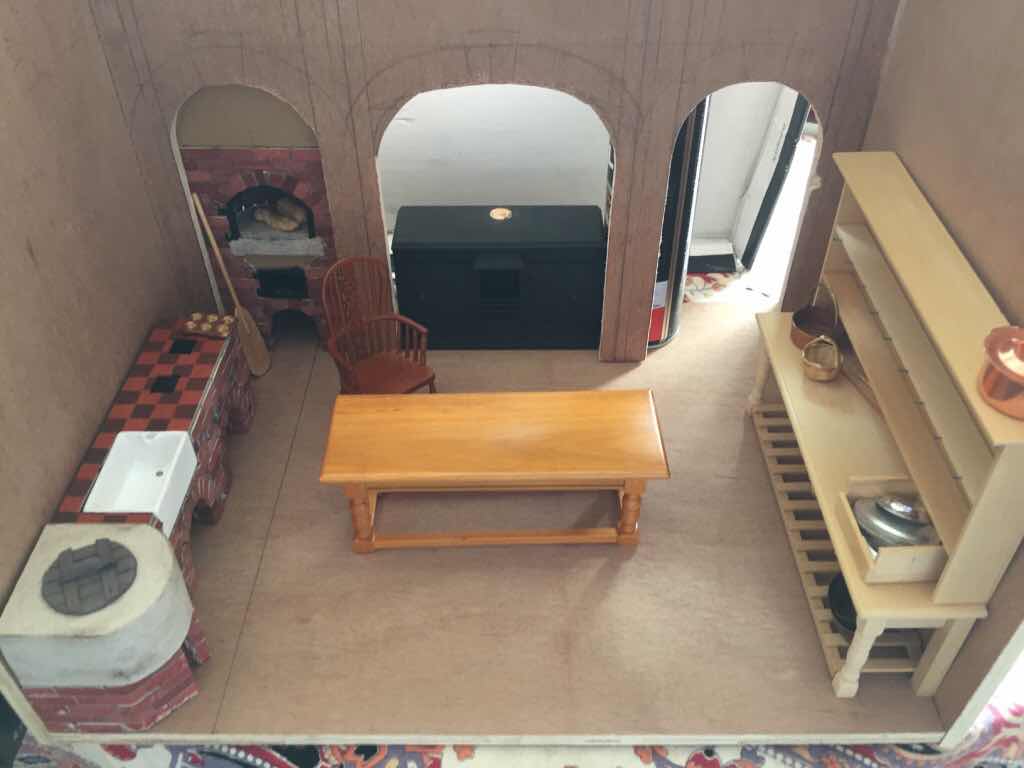
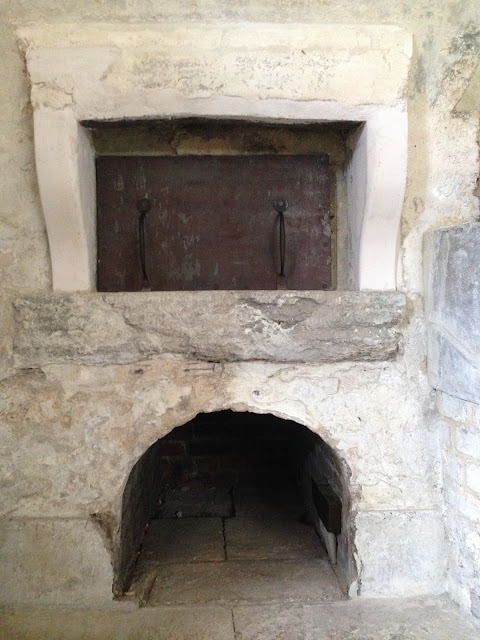
I had a vague plan for my kitchen even when I started the castle in my childhood. I bought a Victorian cooker back then at a dolls house fair, knowing that one day it would be needed. And later on in the planning stages, I decided I wanted to copy the three arches design of the kitchen at Castle Ashby in Northamptonshire (below) with the Victorian unit in the middle.


First I laid out the wall design on graph paper, being careful to make the centre arch the right width for my cooker.


Then I made the walls, floor and ceiling from plywood, cutting the three arches with a jigsaw.


Then I proceeded to make the bread oven, sink/brick oven unit, and copper boiler washing machine from cardboard with bricks made of egg carton. The Belfast sink is a bought one, made from a plastic mould and painted white.


I have had to put the kitchen on the back burner for a while whilst I finish other rooms that I have started, but her is a sneak preview of what it might be like when I return to it...


YUGUE: the kitchen washing machine

I have read many posts by folk who bemoan that mini washing copper boilers are too pricey to buy, and many replies saying they are easy to make. So obviously I decided to make my own. This also meant I could have more choice in how big it would be, where in the kitchen it would fit, and what style to make it. 

I have photographed many examples in the past:


But I couldn't get the one at Kew Palace out of my head, so I have opted for a version of that:


My own has a more angular base but still with the same millstone like top. I've made the basin out of a Kinder Surprise container (I have collected many of their Star Wars toys recently intending to make them into gargoyles on the outer walls!)


The structure is box card, with cereal card for the 'millstone' and egg carton bricks for the base. The iron door is cereal card layered up and painted black with acrylics. Here though I realise that I got the angles of the brick base structure a bit wrong, meaning that my design for the door was too big, so I had to redesign it, remake it a few mms smaller. 


This was a challenge: the handle is now 1mm wide and the hinges 2mm! Here are the two attempts side by side:


I dry-brushed the millstone top with acrylics to get a more stoney feel. The lid is made of coffee stirrers, again painted with grey acrylic, and dry brushed with black, to imitate the Kew Palace inspiration.


I had to make lots more bricks to finish the project as I had used up my first batch on the bread oven and brick stoves. 


Once the egg carton bricks have been stuck on, the finishing touches will be grouting and possibly giving a little dry brush of white over the top as if it was once painted brick. 


YUGUE: the kitchen sink

A castle must have everything: even a kitchen sink. But I have always thought the typical dolls house sink (Belfast sink in two brick supports) was a bit, well, typical. Trying to pack in as many kitchen features as possible, I decided that the Victorian owners must have converted an old Georgian brick stove into a sink when the Victorian stove range was installed. That way I could make a brick stove AND a sink I the same space a bit like this one at Lanhydrock (?):


Here are some of the other brick stoves that inspired me: 

Kew Palace 

Ham House

My digs in Nottingham whilst on tour with RSC's Dream 16!

And here is mine under construction: 


The structure is box card, with cereal card for the arches. The egg carton bricks are placed 7mm apart. I don't think I've really got the hang of the brick arches though.

And here it is before the grouting:


The sink is a bought, plastic sink, painted white with acrylics.


Monday 20 June 2016

YUGUE: the kitchen bread oven

Trying to fit everything you want into a miniature kitchen is always problematic: the central table, the dresser, and the stove are essential, but then there's the bread ovens, the washing boilers, the sinks, the old brick hobs, dairies, laundries, pastry cupboards, the servant bells, the servants' hall, the butler's pantry, the housekeeper's room, the distillery, the list goes on and on. But I only really have space for one kitchen in the castle so I have to pack in as much as possible. 

I've started with the bread oven, and even here I'm faced with choice: a large metal Georgian town house style affair or a traditional Tudor/medieval hole in the wall covered by a makeshift board?


 In the end I've tried to combine the old with the 'new' so that the Georgian covers a potentially older oven. 


I've made it entirely out of odds and ends. The backing is corrugated card, the bricks are made of from egg carton painted with various shades of burnt sienna, the 'iron' fittings are all cereal card board layered up, then painted with black acrylic, but the working handles are metal stationary paper binders. As usual with all the cardboard, I place the card behind my original graph paper design, pin-prick through to the card, then do a dot-to-dot and cut it exactly with a craft knife. This means that when layering up the card I can be pretty accurate with measurements as small as 1mm thick. 


The oven is a bit 'eggy.' The inside is made from the packaging of an egg timer (the sort you put in with the eggs and it changes colour), painted and covered in egg carton bricks. 


All the brickwork will need to be grouted. I've never done this before so it will be a bit nerve wracking. I might need to practise on a spare but first. 


I also have yet to work out how to hinge the doors... It may be just using the pliability of the card itself to hinge but that might tear over time; so I might opt for a more complicated hinge, wrapping the card 'hinges' around a peg, more like the iron originals.